Deployment
Requesting website
A website can be requested at the CERN web services. https://webservices.web.cern.ch/webservices/
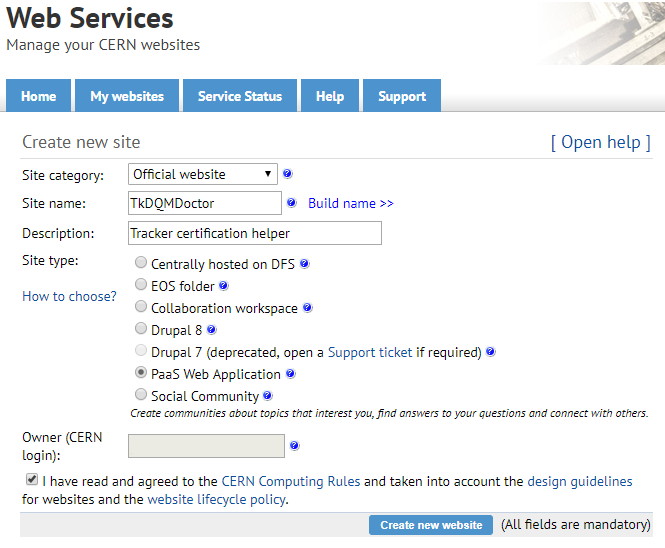
When creating a website a lot of different site types can be chosen. In order to use the OpenShift software, the “PaaS Web Application” option has to be selected. About 15 minutes after the website has been requested it is ready to use.
OpenShift
Setup
Once the website is successfully requested the application should be available in OpenShift. Following steps need to be done in order to configure the web application with the GitHub repository:
select the project
click “Browse Catalog”
choose Python
click “Next”
on “Add to Project” select your Project
choose Version 3.5 (3.6 is buggy)
Fill Application Name and Link to GitHub repository e.g.: test-tkdqmdoctor https://github.com/CMSTrackerDPG/TkDQMDoctor
click on “advanced options”
set branch name in “Git Reference” if branch anything other than “master”
add GitHub credentials at “Source Secret” if the repository is private
Check “Secure route”
Set “TLS Termination” to “Edge”
set “Insecure Traffic” to “Redirect”
under “Build Configuration” add Environment Variables (Build and Runtime):
this is needed for OpenShift to be able to access the site
DJANGO_ALLOWED_HOSTS <your openshift website>
this will be used for the database credentials:
DJANGO_SECRET_KEY          <your-secret>
DJANGO_DEBUG               False
this will be used for the database credentials:
DJANGO_DATABASE_ENGINE     django.db.backends.postgresql_psycopg2
DJANGO_DATABASE_NAME       <your-database-name>
DJANGO_DATABASE_USER       <your-username>
DJANGO_DATABASE_PASSWORD   <your-password>
DJANGO_DATABASE_HOST       <your-database-host>
DJANGO_DATABASE_PORT       6600
this will be used for the email notifications:
DJANGO_EMAIL_HOST          smtp.cern.ch
DJANGO_EMAIL_PORT          587
DJANGO_EMAIL_HOST_USER     <your-email-username>
DJANGO_EMAIL_HOST_PASSWORD <your-email-password>
DJANGO_EMAIL_USE_TLS       True
DJANGO_SERVER_EMAIL        <tkdqmdoctor-email-address>
click on “CREATE”
Note: The application has to be set up only once. Once it is fully configured it probably has to never be touched again.
Mount EOS Storage
The project has 1 TB of storage associated in the EOS. To mount it to OpenShift follow these instructions.
Detailed instructions can be found at https://cern.service-now.com/service-portal/article.do?n=KB0005259
Prerequisites
Download the os command line utility.
https://www.okd.io/download.html
On Arch Linux all you have to do is install origin-client-bin from
the AUR.
yay -S origin-client-bin
Login
Go to the openshift website and click on your name in the top right
corner and click on Copy Login Command and login in your terminal by
pasting it.
Select Project
$ oc project <your-project-name>
Create Secret
Replace with your password.
oc create secret generic eos-credentials --type=eos.cern.ch/credentials --from-literal=keytab-user=tkdqmdoc --from-literal=keytab-pwd=<the-password>
Do EOS stuff
Run these commands and replace with the name of your build.
oc set volume dc/<your-build-name> --add --name=eos --type=persistentVolumeClaim --mount-path=/eos --claim-name=eos-volume --claim-class=eos --claim-size=1

oc patch dc/<your-build-name> -p "$(curl --silent https://gitlab.cern.ch/paas-tools/eosclient-openshift/raw/master/eosclient-container-patch.json)"

oc set probe dc/<your-build-name> --liveness --initial-delay-seconds=30 -- stat /eos/project/t/tkdqmdoc

oc set probe dc/<your-build-name> --readiness -- stat /eos/project/t/tkdqmdoc
if it gets stuck or you encouter some errors on openshift like
Readiness probe failed: stat: cannot stat '/eos/project/t/tkdqmdoc': No such file or directory
then rerun all 4 commands again:
oc set volume dc/<your-build-name> --add --name=eos --type=persistentVolumeClaim --mount-path=/eos --claim-name=eos-volume --claim-class=eos --claim-size=1

oc patch dc/<your-build-name> -p "$(curl --silent https://gitlab.cern.ch/paas-tools/eosclient-openshift/raw/master/eosclient-container-patch.json)"

oc set probe dc/<your-build-name> --liveness --initial-delay-seconds=30 -- stat /eos/project/t/tkdqmdoc

oc set probe dc/<your-build-name> --readiness -- stat /eos/project/t/tkdqmdoc
Then start the built and it should work.
Deployment
Development Site
The Development website is configured to automatically deploy every time a push to the Github repository is performed.
Production Site
If you want to push to the production website (master branch) you have to manually trigger a build at Openshift (https://openshift.cern.ch/console/project/tkdqmdoctor). This is due to safety reasons, to not accidentally trigger a broken build by pushes to the master branch.
This can be done by visiting
openshift.cern.ch, selecting the
TkDQMDoctor project and then visiting Build -> builds. This
page should already contain a build of the TkDQMDoctor project that is
automatically pulled from GitHub. By clicking on this build and then
pressing the build button the whole deployment process should be
started. In the meantime, the logs of the build process can be viewed by
clicking on View Log.
Database
The database was requested from the CERN “DB on demand service” (https://dbod.web.cern.ch/)
After the database has been requested it can be used straight away. Django takes care of creating the necessary tables and only requires the credentials.
Single Sign-On
CERN Setup
OAuth2 is an authorization service which can be used to authenticate CERN users. The advanctage of using such an authorization service is that users of the certification helper do not have register manually, but can already use their existing CERN accounts.
In order to integrate the CERN OAuth2 service with the website, the application has to be registered at the SSO Managment site. https://sso-management.web.cern.ch/OAuth/RegisterOAuthClient.aspx
When registering a redirect_uri has to specified which in case of the
certification helper is
https://tkdqmdoctor.web.cern.ch/accounts/cern/login/callback/ for
the production website and
https://dev-tkdqmdoctor.web.cern.ch/accounts/cern/login/callback/
for the development site.
Integration
The single sign-on integration is very easy when using the django-allauth python package, which has build in CERN support.
In order to make use CERN single sign-on service it has to be configured in the Admin Panel under “Social applications”. There the client id and secret key has to be specified which can be listed in the “cern sso-managment” website.